零.Bootstrap初始化 Bootstrap 可以看成是一个 TomcatServer 运行时需要的环境的准备,这里通过加载配置文件,设置全局数据以便让后面的 组件 初始化的时候可以使用到。
一.获取Tomcat运行的配置目录 那么首先是在 static代码块 中获取到运行环境的目录基础:
1
2
3
4
5
6
7
8
9
10
11
12
13
14
15
16
17
18
19
20
21
22
23
24
25
26
27
28
29
30
31
32
33
34
35
36
37
38
39
40
41
42
43
44
45
46
47
48
49
50
51
52
53
54
55
56
57
58
59
60
61
62
63
64
65
66
67
68
69
70
71
72
public final class Bootstrap { private static final Log log = LogFactory.getLog(Bootstrap.class); private static final Object daemonLock = new Object (); private static volatile Bootstrap daemon = null ; private static final File catalinaBaseFile; private static final File catalinaHomeFile; private static final Pattern PATH_PATTERN = Pattern.compile("(\".*?\")(([^,])*)" ); static { String userDir = System.getProperty("user.dir" ); String home = System.getProperty(Globals.CATALINA_HOME_PROP); File homeFile = null ; if (home != null ) { File f = new File (home); try { homeFile = f.getCanonicalFile(); } catch (IOException ioe) { homeFile = f.getAbsoluteFile(); } } if (homeFile == null ) { File bootstrapJar = new File (userDir, "bootstrap.jar" ); if (bootstrapJar.exists()) { File f = new File (userDir, ".." ); try { homeFile = f.getCanonicalFile(); } catch (IOException ioe) { homeFile = f.getAbsoluteFile(); } } } if (homeFile == null ) { File f = new File (userDir); try { homeFile = f.getCanonicalFile(); } catch (IOException ioe) { homeFile = f.getAbsoluteFile(); } } catalinaHomeFile = homeFile; System.setProperty( Globals.CATALINA_HOME_PROP, catalinaHomeFile.getPath()); String base = System.getProperty(Globals.CATALINA_BASE_PROP); if (base == null ) { catalinaBaseFile = catalinaHomeFile; } else { File baseFile = new File (base); try { baseFile = baseFile.getCanonicalFile(); } catch (IOException ioe) { baseFile = baseFile.getAbsoluteFile(); } catalinaBaseFile = baseFile; } System.setProperty( Globals.CATALINA_BASE_PROP, catalinaBaseFile.getPath()); } }
二.读取运行参数 既然第一步已经初始化好了运行时所需要使用的 文件路径,那么接下来肯定就是读取配置并且根据配置来初始化项目了。这一步就直接在 main 方法中进行调用:
1
2
3
4
5
6
7
8
9
10
11
12
13
14
15
16
17
18
19
20
21
22
23
24
25
26
27
28
29
30
31
32
33
34
35
36
37
38
39
40
41
42
43
44
45
46
47
48
49
50
51
52
53
54
55
56
57
58
59
60
61
62
63
64
65
66
public final class Bootstrap { public static void main (String args[]) { synchronized (daemonLock) { if (daemon == null ) { Bootstrap bootstrap = new Bootstrap (); try { bootstrap.init(); } catch (Throwable t) { handleThrowable(t); t.printStackTrace(); return ; } daemon = bootstrap; } else { Thread.currentThread().setContextClassLoader(daemon.catalinaLoader); } } try { String command = "start" ; if (args.length > 0 ) { command = args[args.length - 1 ]; } if (command.equals("startd" )) { args[args.length - 1 ] = "start" ; daemon.load(args); daemon.start(); } else if (command.equals("stopd" )) { args[args.length - 1 ] = "stop" ; daemon.stop(); } else if (command.equals("start" )) { daemon.setAwait(true ); daemon.load(args); daemon.start(); if (null == daemon.getServer()) { System.exit(1 ); } } else if (command.equals("stop" )) { daemon.stopServer(args); } else if (command.equals("configtest" )) { daemon.load(args); if (null == daemon.getServer()) { System.exit(1 ); } System.exit(0 ); } else { log.warn("Bootstrap: command \"" + command + "\" does not exist." ); } } catch (Throwable t) { if (t instanceof InvocationTargetException && t.getCause() != null ) { t = t.getCause(); } handleThrowable(t); t.printStackTrace(); System.exit(1 ); } } }
2.1 Bootstrap初始化 包括初始化自定义的 ClassLoader 以及 Catalina 的准备工作。
1
2
3
4
5
6
7
8
9
10
11
12
13
14
15
16
17
18
19
20
21
22
23
24
25
26
27
28
public void init () throws Exception { initClassLoaders(); Thread.currentThread().setContextClassLoader(catalinaLoader); SecurityClassLoad.securityClassLoad(catalinaLoader); if (log.isDebugEnabled()) log.debug("Loading startup class" ); Class<?> startupClass = catalinaLoader.loadClass("org.apache.catalina.startup.Catalina" ); Object startupInstance = startupClass.getConstructor().newInstance(); if (log.isDebugEnabled()) log.debug("Setting startup class properties" ); String methodName = "setParentClassLoader" ; Class<?> paramTypes[] = new Class [1 ]; paramTypes[0 ] = Class.forName("java.lang.ClassLoader" ); Object paramValues[] = new Object [1 ]; paramValues[0 ] = sharedLoader; Method method = startupInstance.getClass().getMethod(methodName, paramTypes); method.invoke(startupInstance, paramValues); catalinaDaemon = startupInstance; }
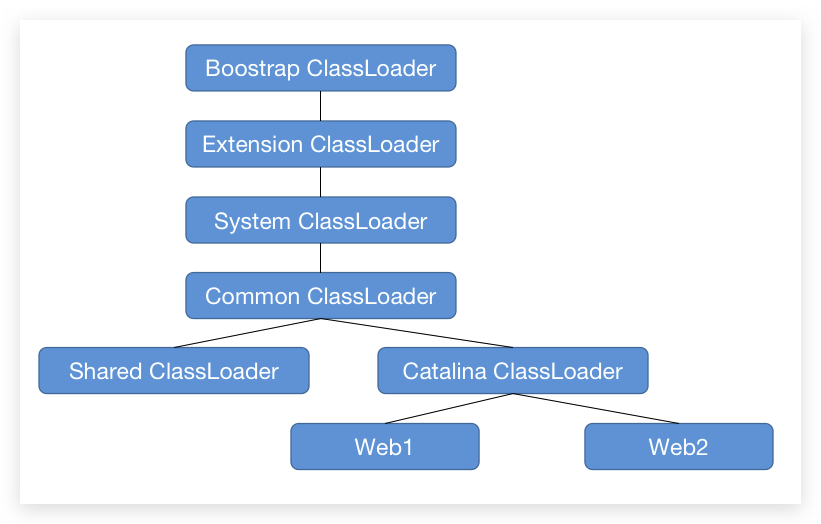
首先需要初始化三个 ClassLoader(但其实到最后三个都指向 commonLoader):
1
2
3
4
5
6
7
8
9
10
11
12
13
14
15
private void initClassLoaders () { try { commonLoader = createClassLoader("common" , null ); if (commonLoader == null ) { commonLoader = this .getClass().getClassLoader(); } catalinaLoader = createClassLoader("server" , commonLoader); sharedLoader = createClassLoader("shared" , commonLoader); } catch (Throwable t) { handleThrowable(t); log.error("Class loader creation threw exception" , t); System.exit(1 ); } }
那么我们现在就有这些 ClassLoader:
每一层加载 Class 的时候, Loader 就都会说:你去找你爷去,找到最后没有找到,才退下来一层,如果找到了就返回,到最后都没有找到就会抛出 ClassNotFoundException。 所以这种方式可以很好的防止我们使用一个同样的类,对 Tomcat 造成破坏。 根据 catalina-home/conf/catalina.properties 的配置创建初始化 ClassLoader。我们使用的是默认配置:
1
2
3
common.loader ="${catalina.base}/lib","${catalina.base}/lib/*.jar","${catalina.home}/lib","${catalina.home}/lib/*.jar" server.loader =shared.loader =
由于只有 common.loader 配置了规则,所以下面两个在创建的时候由于没有配置,直接将 commonClassLoader 返回了。
1
2
3
4
5
6
7
8
9
10
11
12
13
14
15
16
17
18
19
20
21
22
23
24
25
26
27
28
29
30
31
32
33
34
35
36
37
38
39
40
41
private ClassLoader createClassLoader (String name, ClassLoader parent) throws Exception { String value = CatalinaProperties.getProperty(name + ".loader" ); if ((value == null ) (value.equals("" ))) return parent; value = replace(value); List<Repository> repositories = new ArrayList <>(); String[] repositoryPaths = getPaths(value); for (String repository : repositoryPaths) { try { @SuppressWarnings("unused") URL url = new URL (repository); repositories.add(new Repository (repository, RepositoryType.URL)); continue ; } catch (MalformedURLException e) { } if (repository.endsWith("*.jar" )) { repository = repository.substring (0 , repository.length() - "*.jar" .length()); repositories.add(new Repository (repository, RepositoryType.GLOB)); } else if (repository.endsWith(".jar" )) { repositories.add(new Repository (repository, RepositoryType.JAR)); } else { repositories.add(new Repository (repository, RepositoryType.DIR)); } } return ClassLoaderFactory.createClassLoader(repositories, parent); }
更进一步的就不打算走下去了,只要知道目前 commonClassLoader 加载了 lib 下的所有包就可以了。
2.2 Bootstrap启动 加载完 jar 包目录,接下来就是启动了,在 main 方法里面我们可以直接看这几句话:
1
2
3
4
5
6
7
8
9
else if (command.equals("start" )) { daemon.setAwait(true ); daemon.load(args); daemon.start(); if (null == daemon.getServer()) { System.exit(1 ); } }
首先,设置 Catalina 进行等候:
1
2
3
4
5
6
7
8
9
10
11
public void setAwait (boolean await) throws Exception { Class<?> paramTypes[] = new Class [1 ]; paramTypes[0 ] = Boolean.TYPE; Object paramValues[] = new Object [1 ]; paramValues[0 ] = Boolean.valueOf(await); Method method = catalinaDaemon.getClass().getMethod("setAwait" , paramTypes); method.invoke(catalinaDaemon, paramValues); }
我们可以看到 Bootstrap 设置 Catalina 的时候,一直都是通过反射的形式调用,这是因为 Boostrap 要保证 Catalina 类和 XML读取的相关工具 在不同的 ClassLoader 中,从而可以保证 Catalina 加载的我们 war 项目不可以访问到 Tomcat的关键类。
Catalina:蛮好听的名字,查了一下百度资料,Catalina 是美国西海岸靠近洛杉矶22英里的一个小岛,因为其风景秀丽而著名。 Servlet 运行模块的最早开发者 Craig McClanahan 因为喜欢 Catalina岛 故以 Catalina 命名他所开这个模块,尽管他从来也没有去过那里。 另外在开发的早期阶段,Tomcat是被搭建在一个叫 Avalon 的服务器框架上,而 Avalon 则是 Catalina 岛上的一个小镇的名字,于是想一个与小镇名字相关联的单词也是自然而然。还有一个原因来自于 Craig McClanahan 养的猫,他养的猫在他写程序的时候喜欢在电脑周围闲逛。
那就想象成 Bootstrap 把这个岛建立起来了!。 那第二句 daemon.load(args); 也是通过反射调用,代码就不贴了,直接进入 Catalina.class#load()。
三.Catalina加载配置 1 2 3 4 5 6 7 8 9 10 11 12 13 14 15 16 17 18 19 20 21 22 23 24 25 26 27 28 29 30 31 32 33 34 35 36 37 38 39 40 41 42 43 44 45 46 47 48 49 50 51 52 53 54 55 56 57 58 59 60 61 62 63 64 65 66 67 68 69 70 71 72 73 74 75 76 77 78 79 80 81 82 83 84 85 86 87 88 89 90 91 92 93 94 95 96 97 98 99 100 101 102 103 104 105 106 107 108 109 110 111 112 113 114 115 116 117 118 119 public class Catalina { public void load () { if (loaded) { return ; } loaded = true ; long t1 = System.nanoTime(); initDirs(); initNaming(); Digester digester = createStartDigester(); InputSource inputSource = null ; InputStream inputStream = null ; File file = null ; try { try { file = configFile(); inputStream = new FileInputStream (file); inputSource = new InputSource (file.toURI().toURL().toString()); } catch (Exception e) { if (log.isDebugEnabled()) { log.debug(sm.getString("catalina.configFail" , file), e); } } if (inputStream == null ) { try { inputStream = getClass().getClassLoader() .getResourceAsStream(getConfigFile()); inputSource = new InputSource (getClass().getClassLoader() .getResource(getConfigFile()).toString()); } catch (Exception e) { if (log.isDebugEnabled()) { log.debug(sm.getString("catalina.configFail" , getConfigFile()), e); } } } if (inputStream == null ) { try { inputStream = getClass().getClassLoader() .getResourceAsStream("server-embed.xml" ); inputSource = new InputSource (getClass().getClassLoader() .getResource("server-embed.xml" ).toString()); } catch (Exception e) { if (log.isDebugEnabled()) { log.debug(sm.getString("catalina.configFail" , "server-embed.xml" ), e); } } } if (inputStream == null inputSource == null ) { if (file == null ) { log.warn(sm.getString("catalina.configFail" , getConfigFile() + "] or [server-embed.xml]" )); } else { log.warn(sm.getString("catalina.configFail" , file.getAbsolutePath())); if (file.exists() && !file.canRead()) { log.warn("Permissions incorrect, read permission is not allowed on the file." ); } } return ; } try { inputSource.setByteStream(inputStream); digester.push(this ); digester.parse(inputSource); } catch (SAXParseException spe) { log.warn("Catalina.start using " + getConfigFile() + ": " + spe.getMessage()); return ; } catch (Exception e) { log.warn("Catalina.start using " + getConfigFile() + ": " , e); return ; } } finally { if (inputStream != null ) { try { inputStream.close(); } catch (IOException e) { } } } getServer().setCatalina(this ); getServer().setCatalinaHome(Bootstrap.getCatalinaHomeFile()); getServer().setCatalinaBase(Bootstrap.getCatalinaBaseFile()); initStreams(); try { getServer().init(); } catch (LifecycleException e) { if (Boolean.getBoolean("org.apache.catalina.startup.EXIT_ON_INIT_FAILURE" )) { throw new java .lang.Error(e); } else { log.error("Catalina.start" , e); } } long t2 = System.nanoTime(); if (log.isInfoEnabled()) { log.info("Initialization processed in " + ((t2 - t1) / 1000000 ) + " ms" ); } } }
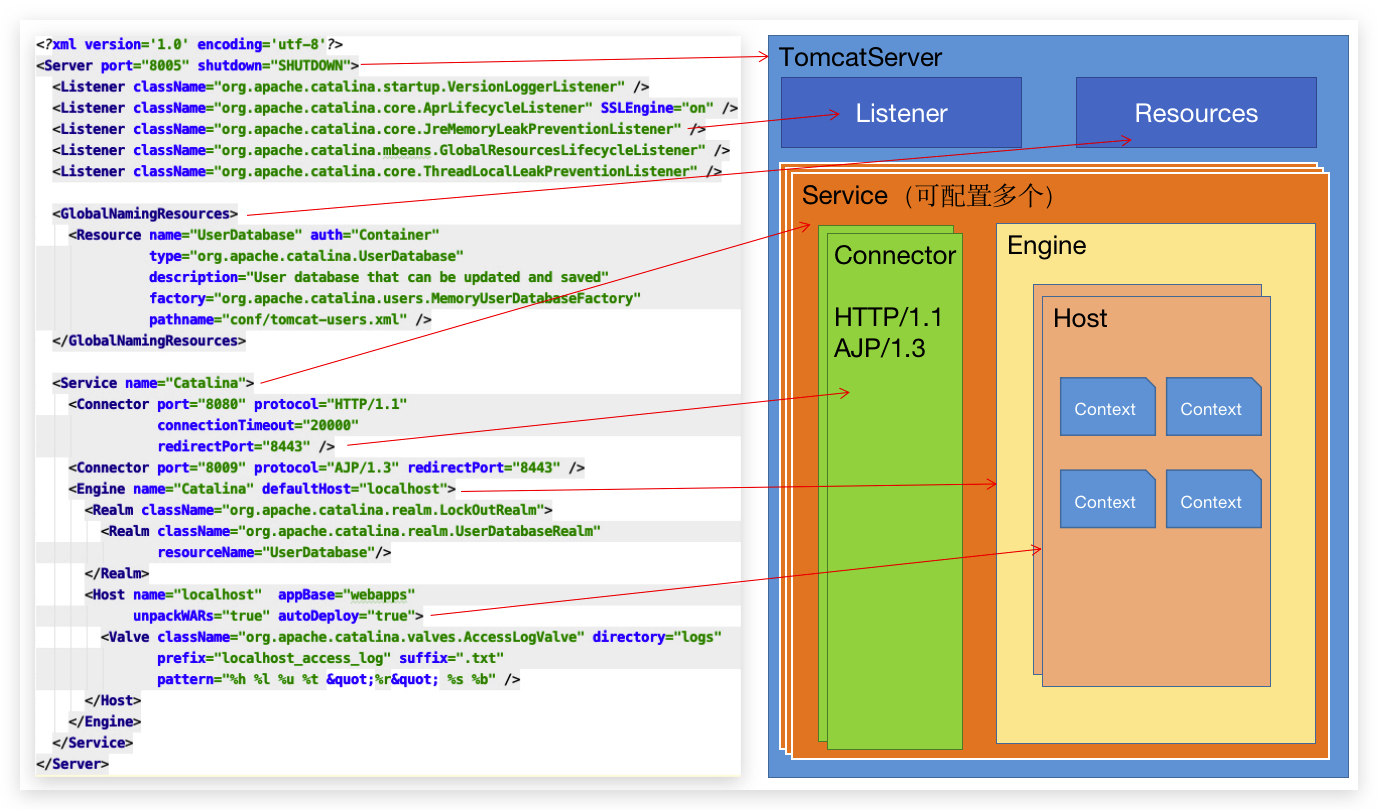
看人家配置解析,Emm还是蛮无聊的,直接跳过去了。只要知道是根据 server.xml 解析创建对象就可以了,在这个过程中,实例化了 server 对象。 那么接下来就需要初始化里面的内容了,我们大概还记得这个图:
getServer().init(); 相当于初始化 TomcatServer。 我们知道一个 Service 包含了 Connector 和 Engine,所以初始化肯定涉及这两个鬼:
1
2
3
4
5
6
7
8
9
10
11
12
13
14
15
16
17
18
19
20
21
22
23
24
25
26
27
28
29
30
31
32
33
34
35
36
37
38
39
40
41
public class StandardService extends LifecycleMBeanBase implements Service { @Override protected void initInternal () throws LifecycleException { super .initInternal(); if (engine != null ) { engine.init(); } for (Executor executor : findExecutors()) { if (executor instanceof JmxEnabled) { ((JmxEnabled) executor).setDomain(getDomain()); } executor.init(); } mapperListener.init(); synchronized (connectorsLock) { for (Connector connector : connectors) { try { connector.init(); } catch (Exception e) { String message = sm.getString( "standardService.connector.initFailed" , connector); log.error(message, e); if (Boolean.getBoolean("org.apache.catalina.startup.EXIT_ON_INIT_FAILURE" )) throw new LifecycleException (message); } } } } }
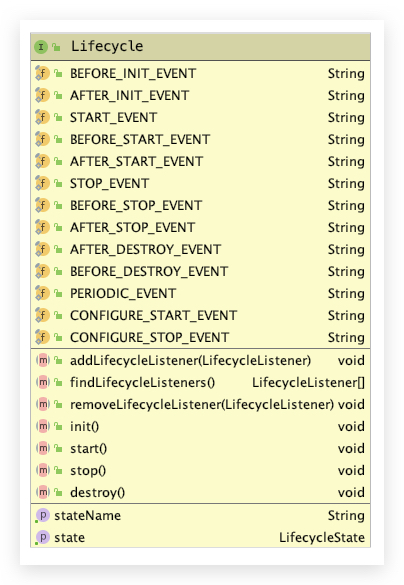
四.StandardServer初始化 4.1 lifecycle生命周期转换 StandardServer 就需要先看看 Lifecycle 接口了:
这个接口规范了在 Tomcat 运行期间的 生命周期函数。只要跟 Tomcat 一起运行的,就会有这些 生命周期。 与此同时还有个 LifecycleBase 实现了基本的生命周期转换:
1
2
3
4
5
6
7
8
9
10
11
12
13
14
15
16
17
18
19
20
21
public abstract class LifecycleBase implements Lifecycle { @Override public final synchronized void init () throws LifecycleException { if (!state.equals(LifecycleState.NEW)) { invalidTransition(Lifecycle.BEFORE_INIT_EVENT); } try { setStateInternal(LifecycleState.INITIALIZING, null , false ); initInternal(); setStateInternal(LifecycleState.INITIALIZED, null , false ); } catch (Throwable t) { handleSubClassException(t, "lifecycleBase.initFail" , toString()); } } protected abstract void initInternal () throws LifecycleException; }
4.2 StandardServer初始化 1 2 3 4 5 6 7 8 9 10 11 12 13 14 15 16 17 18 19 20 21 22 23 24 25 26 27 28 29 30 31 32 33 34 35 36 37 38 39 40 41 42 43 44 45 46 47 48 49 50 51 public final class StandardServer extends LifecycleMBeanBase implements Server { @Override protected void initInternal () throws LifecycleException { super .initInternal(); onameStringCache = register(new StringCache (), "type=StringCache" ); MBeanFactory factory = new MBeanFactory (); factory.setContainer(this ); onameMBeanFactory = register(factory, "type=MBeanFactory" ); globalNamingResources.init(); if (getCatalina() != null ) { ClassLoader cl = getCatalina().getParentClassLoader(); while (cl != null && cl != ClassLoader.getSystemClassLoader()) { if (cl instanceof URLClassLoader) { URL[] urls = ((URLClassLoader) cl).getURLs(); for (URL url : urls) { if (url.getProtocol().equals("file" )) { try { File f = new File (url.toURI()); if (f.isFile() && f.getName().endsWith(".jar" )) { ExtensionValidator.addSystemResource(f); } } catch (URISyntaxException e) { } catch (IOException e) { } } } } cl = cl.getParent(); } } for (int i = 0 ; i < services.length; i++) { services[i].init(); } } }
加载了一些 Jar 包,然后就初始化我们最熟悉的 Service。
五.StandardService初始化 同样的实现了 Lifecycle 接口,所以我们只需要关注 initInternal 即可。那我们知道 Service 是包含一个 Engine 和 接收数据的 Connector 的。所以他的初始化主要是关注这两者:
1
2
3
4
5
6
7
8
9
10
11
12
13
14
15
16
17
18
19
20
21
22
23
24
25
26
27
28
29
30
31
32
33
34
35
36
37
38
39
public class StandardService extends LifecycleMBeanBase implements Service { @Override protected void initInternal () throws LifecycleException { super .initInternal(); if (engine != null ) { engine.init(); } for (Executor executor : findExecutors()) { if (executor instanceof JmxEnabled) { ((JmxEnabled) executor).setDomain(getDomain()); } executor.init(); } mapperListener.init(); synchronized (connectorsLock) { for (Connector connector : connectors) { try { connector.init(); } catch (Exception e) { String message = sm.getString( "standardService.connector.initFailed" , connector); log.error(message, e); if (Boolean.getBoolean("org.apache.catalina.startup.EXIT_ON_INIT_FAILURE" )) throw new LifecycleException (message); } } } } }
六.Engine初始化 Engine 默认实现是 StandardEngine :
1
2
3
4
5
6
7
8
9
10
public class StandardEngine extends ContainerBase implements Engine { @Override protected void initInternal () throws LifecycleException { getRealm(); super .initInternal(); } }
来瞄一下配置文件:
1
2
3
4
5
6
7
8
9
10
11
12
13
14
15
16
17
18
19
20
21
22
<Server> <!-- 省略 --> <Service name="Catalina"> <Connector port="8080" protocol="HTTP/1.1" connectionTimeout="20000" redirectPort="8443" /> <Connector port="8009" protocol="AJP/1.3" redirectPort="8443" secretRequired=""/> <Engine name="Catalina" defaultHost="localhost"> <!-- 这是一个混合的Realm认证,可以包含其他的 Realm --> <Realm className="org.apache.catalina.realm.LockOutRealm"> <Realm className="org.apache.catalina.realm.UserDatabaseRealm" resourceName="UserDatabase"/> </Realm> <Host name="localhost" appBase="webapps" unpackWARs="true" autoDeploy="true"> <Valve className="org.apache.catalina.valves.AccessLogValve" directory="logs" prefix="localhost_access_log" suffix=".txt" pattern="%h %l %u %t "%r" %s %b" /> </Host> </Engine> </Service> </Server>
LockOutRealm 是一个可以组合子 Realm 的类,规定了在一定时间内 用户鉴权出错次数,超出次数则会返回错误。不过项目中一般不用这个。 接下来 super.initInternal() ,父类不是 LifecycleBase 了,而是另外一个类:ContainerBase
1
2
3
4
5
6
7
8
9
10
11
12
13
14
public abstract class ContainerBase extends LifecycleMBeanBase implements Container { @Override protected void initInternal () throws LifecycleException { BlockingQueue<Runnable> startStopQueue = new LinkedBlockingQueue <>(); startStopExecutor = new ThreadPoolExecutor ( getStartStopThreadsInternal(), getStartStopThreadsInternal(), 10 , TimeUnit.SECONDS, startStopQueue, new StartStopThreadFactory (getName() + "-startStop-" )); startStopExecutor.allowCoreThreadTimeOut(true ); super .initInternal(); } }
这就是初始化线程池实例以便后续可以让项目可以并行执行部署。
七.MapperListener初始化 这个容器主要处理 HOST 以及 URI 映射的 Servlet。初始化没做什么事情,只是注册了个名字,先跳过不看。
八.Connector初始化 1 2 3 4 5 6 7 8 9 10 11 12 13 14 15 16 17 18 19 20 21 22 23 24 25 26 27 28 29 30 31 32 33 34 35 36 37 38 39 40 41 42 43 44 45 46 47 48 49 50 51 52 53 54 55 56 57 58 59 60 61 public class Connector extends LifecycleMBeanBase { @Override protected void initInternal () throws LifecycleException { super .initInternal(); adapter = new CoyoteAdapter (this ); protocolHandler.setAdapter(adapter); if (null == parseBodyMethodsSet) { setParseBodyMethods(getParseBodyMethods()); } if (protocolHandler.isAprRequired() && !AprLifecycleListener.isInstanceCreated()) { throw new LifecycleException (sm.getString("coyoteConnector.protocolHandlerNoAprListener" , getProtocolHandlerClassName())); } if (protocolHandler.isAprRequired() && !AprLifecycleListener.isAprAvailable()) { throw new LifecycleException (sm.getString("coyoteConnector.protocolHandlerNoAprLibrary" , getProtocolHandlerClassName())); } if (AprLifecycleListener.isAprAvailable() && AprLifecycleListener.getUseOpenSSL() && protocolHandler instanceof AbstractHttp11JsseProtocol) { AbstractHttp11JsseProtocol<?> jsseProtocolHandler = (AbstractHttp11JsseProtocol<?>) protocolHandler; if (jsseProtocolHandler.isSSLEnabled() && jsseProtocolHandler.getSslImplementationName() == null ) { jsseProtocolHandler.setSslImplementationName(OpenSSLImplementation.class.getName()); } } try { protocolHandler.init(); } catch (Exception e) { throw new LifecycleException ( sm.getString("coyoteConnector.protocolHandlerInitializationFailed" ), e); } } public void setParseBodyMethods (String methods) { HashSet<String> methodSet = new HashSet <>(); if (null != methods) { methodSet.addAll(Arrays.asList(methods.split("\\s*,\\s*" ))); } if (methodSet.contains("TRACE" )) { throw new IllegalArgumentException (sm.getString("coyoteConnector.parseBodyMethodNoTrace" )); } this .parseBodyMethods = methods; this .parseBodyMethodsSet = methodSet; setProperty("parseBodyMethods" , methods); } }
九.Http11NIOProtocol初始化 Http11NIOProtocol 是一个 HTTP 1.1 的解析器,所以他需要负责 Request 和 Response 的解析,所以,这里又通过一个 Endpoint 组件来做,所以需要初始化 Endpont
1
2
3
4
5
6
7
8
9
10
11
12
13
14
15
16
17
18
19
20
21
22
23
24
25
26
27
28
29
30
public abstract class AbstractProtocol <S> implements ProtocolHandler , MBeanRegistration { @Override public void init () throws Exception { if (getLog().isInfoEnabled()) { getLog().info(sm.getString("abstractProtocolHandler.init" , getName())); } if (oname == null ) { oname = createObjectName(); if (oname != null ) { Registry.getRegistry(null , null ).registerComponent(this , oname, null ); } } if (this .domain != null ) { rgOname = new ObjectName (domain + ":type=GlobalRequestProcessor,name=" + getName()); Registry.getRegistry(null , null ).registerComponent( getHandler().getGlobal(), rgOname, null ); } String endpointName = getName(); endpoint.setName(endpointName.substring(1 , endpointName.length()-1 )); endpoint.setDomain(domain); endpoint.init(); } }
1
2
3
4
5
6
7
8
9
10
11
12
13
14
15
16
17
18
19
20
21
22
public abstract class AbstractJsseEndpoint <S> extends AbstractEndpoint <S> { @Override public void init () throws Exception { testServerCipherSuitesOrderSupport(); super .init(); } private void testServerCipherSuitesOrderSupport () { if (!JreCompat.isJre8Available() && !OpenSSLImplementation.class.getName().equals(getSslImplementationName())) { for (SSLHostConfig sslHostConfig : sslHostConfigs.values()) { if (sslHostConfig.getHonorCipherOrder() != null ) { throw new UnsupportedOperationException ( sm.getString("endpoint.jsse.cannotHonorServerCipherOrder" )); } } } } }
1
2
3
4
5
6
7
8
9
10
11
12
13
14
15
16
17
18
19
20
21
22
23
24
25
26
public abstract class AbstractEndpoint <S> { public void init () throws Exception { if (bindOnInit) { bind(); bindState = BindState.BOUND_ON_INIT; } if (this .domain != null ) { oname = new ObjectName (domain + ":type=ThreadPool,name=\"" + getName() + "\"" ); Registry.getRegistry(null , null ).registerComponent(this , oname, null ); ObjectName socketPropertiesOname = new ObjectName (domain + ":type=ThreadPool,name=\"" + getName() + "\",subType=SocketProperties" ); socketProperties.setObjectName(socketPropertiesOname); Registry.getRegistry(null , null ).registerComponent(socketProperties, socketPropertiesOname, null ); for (SSLHostConfig sslHostConfig : findSslHostConfigs()) { registerJmx(sslHostConfig); } } } }
1
2
3
4
5
6
7
8
9
10
11
12
13
14
15
16
17
18
19
20
21
22
23
24
25
26
27
28
29
30
31
32
33
34
35
36
37
public class NioEndpoint extends AbstractJsseEndpoint <NioChannel> { @Override public void bind () throws Exception { if (!getUseInheritedChannel()) { serverSock = ServerSocketChannel.open(); socketProperties.setProperties(serverSock.socket()); InetSocketAddress addr = (getAddress()!=null ?new InetSocketAddress (getAddress(),getPort()):new InetSocketAddress (getPort())); serverSock.socket().bind(addr,getAcceptCount()); } else { } serverSock.configureBlocking(true ); if (acceptorThreadCount == 0 ) { acceptorThreadCount = 1 ; } if (pollerThreadCount <= 0 ) { pollerThreadCount = 1 ; } setStopLatch(new CountDownLatch (pollerThreadCount)); initialiseSsl(); selectorPool.open(); } }
关于 NIO内核 后面再详细了解了。 一路跳出来,Catalina 的 load() 方法就走完了,至于 start() 丢下一篇。